Some expenses don’t fit neatly into a single month. An emergency fund, a vacation you’re saving for, holiday gifts, annual insurance premiums. You know these costs are coming (or might come), but they don’t show up as a line item every month.
That’s where sinking funds come in. And in Lunch Money, the way to set them up is with category rollovers.
This guide walks you through how to create savings categories that accumulate over time, and two different approaches for spending from them when the time comes.
What’s a sinking fund?
A sinking fund is a category you contribute to over time so the money is there when you need it. Instead of scrambling to cover a $1,200 car repair in one month, you budget $100/month toward a “Car Maintenance” fund. After 12 months, you have $1,200 sitting there, ready.
Common sinking fund categories:
- Emergency fund
- Vacation
- Holiday gifts
- Car maintenance or repairs
- Annual subscriptions (insurance, software, memberships)
- Home repairs
- Medical expenses
Without rollovers, your budget category resets at the start of each period. You’d budget $100 for “Vacation,” not spend it, and that $100 would disappear into the next month with nothing to show for it. Rollovers fix that by letting unspent money carry forward.
For more on how rollovers work generally, see What Is a Budget Rollover? on the Lunch Money blog.
How to set up a savings category with rollovers
Here’s how to create a category that accumulates funds over time:
- Go to your Budget view and find the category you want to use as a savings goal (or head over to the Categories page to create a new one, like “Emergency Fund” or “Vacation”)
- Click the arrow (>) on the far right of the category row to open the side panel
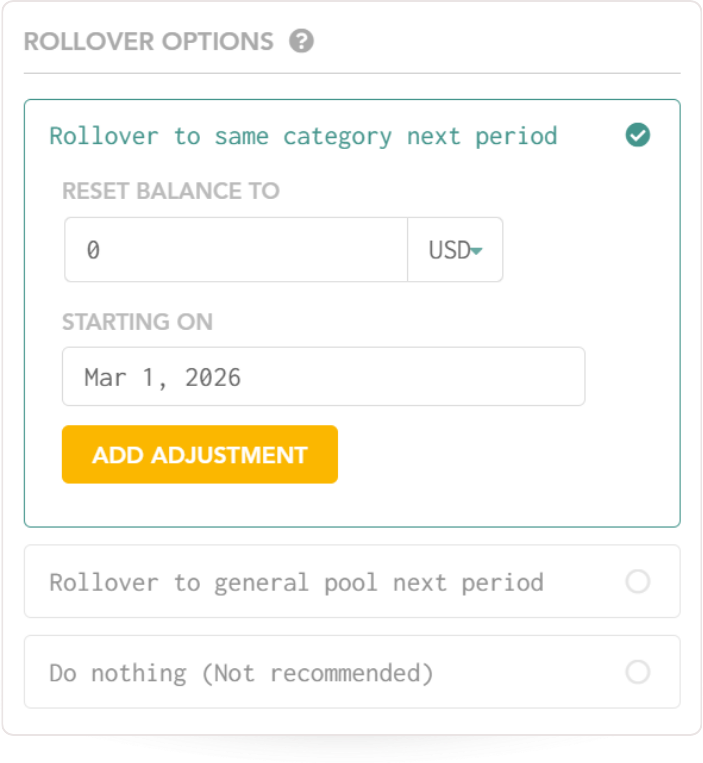
- Under Rollover Options, select Rollover to same category
- Set your starting date (typically the first day of the current budget period)
- Set your starting balance (if you already have money saved toward this goal, enter that amount; otherwise, start at $0)
- Budget a fixed amount each month toward this category
Once enabled, you’ll see an envelope icon next to the category in your budget view. This icon means funds are accumulating in that category across periods.

Tip: Use budget presets to keep your contributions consistent. The “Set fixed amount” preset lets you quickly budget the same amount each period with a single click. Learn more about budget presets here.
When it’s time to spend from your savings
You’ve been budgeting $200/month into your Emergency Fund for a year. You now have $2,400 saved. Then your car breaks down and the repair costs $800.
How do you handle it in Lunch Money? There are two valid approaches! The difference is how you want your spending data organized.
Approach A: Categorize the expense directly to your savings category
When the car repair transaction comes in, you categorize it as Emergency Fund.
- Find the car repair transaction in your Transactions list
- Set its category to Emergency Fund
- Done. The spend activity is reflected for the Emergency Fund category on the Budget page, and the Available balance drops from $2,400 to $1,600

When this works well: You want simplicity. One step, done. You’re not concerned about tracking how much you spend on car maintenance specifically.
The tradeoff: The expense doesn’t show up under “Auto” or “Car Maintenance” in your spending reports. If you later look at your reports to see how much you spent on car-related expenses this year, this $800 won’t be there. It’ll be logged under Emergency Fund instead.
Approach B: Categorize correctly, then move funds
This method keeps your spending reports accurate. You categorize the expense where it actually belongs, then move money from your savings category to cover it.
- Find the car repair transaction in your Transactions list
- Set its category to Auto (or Car Maintenance, wherever you normally track car expenses)
- Go to your Budget view
- Click the exchange icon next to the Available balance for your Auto category
- In the Move Money dialog, transfer $800 from Emergency Fund to Auto
- Confirm the transfer

Your Emergency Fund drops from $2,400 to $1,600. Your Auto category now has enough to cover the expense. And when you pull up spending reports, the $800 shows up under Auto where it belongs.
When this works well: You want clean spending data. You treat savings categories purely as fund pools that accumulate money but never have direct transaction activity. When you review your analytics, every expense is in its correct category.
The tradeoff: It’s an extra step. After categorizing the transaction, you also need to move the funds.
Which approach should you use?
Both are valid. Here’s a quick way to decide:
Choose Approach A (direct categorization) if:
- You value simplicity over detailed reporting
- You don’t often review spending by category
- You think of the savings category as “where the money lives AND where the expense goes”
Choose Approach B (move funds) if:
- You want accurate spending reports across all your categories
- You review your spending analytics regularly to understand where money goes
- You think of savings categories as fund pools that only accumulate, never have direct activity
You can also mix both. Maybe you use Approach A for your “Holiday Gifts” fund (since gifts are their own category anyway) and Approach B for your Emergency Fund (since emergency expenses could fall under many categories). There’s no rule that says you have to pick one approach for everything.
Tips for managing multiple savings goals
Group your savings categories. Create a category group called “Savings” or “Sinking Funds” and put all your savings categories inside it. This keeps your budget view organized and lets you see total savings at a glance.
Start small. If you’re new to sinking funds, start with one or two categories. An emergency fund, and one periodic expense (like annual insurance) is a good starting point. You can always add more once the habit is established.
Use budget presets for consistency. Setting a preset like “Fill Available up to $” means your savings category will never go below that amount. Click here to learn more about budget presets.
Review your balances periodically. Check in on your savings categories every few months. Are you on track? Do you need to adjust your monthly contribution? Has a goal been met and the category can be repurposed?
Consider periodic expenses too. Sinking funds aren’t just for emergencies and big goals. Annual subscriptions, quarterly bills, and seasonal expenses all benefit from the same approach. For a deeper dive, check out How to Budget for Periodic Expenses.
Getting started
Rollovers turn regular budget categories into savings tools. Pick a goal, set up same-category rollover, budget consistently, and choose whichever spending approach fits how you think about your money.
If you’re already using Lunch Money, you can set this up in a few minutes from your Budget view. If you’re not a user yet and want to try this approach, Lunch Money offers a free trial so you can see how it works with your own numbers.